Using your own Master Page and providing blog-like calendar navigation
The content you're reading is getting on in years
This post is on the older side and its content may be out of date.
Be sure to visit our blogs homepage for our latest news, updates and information.
This blog post will explain the basic procedure of creating your own Master Page for Sitefinity and, just to make it a bit less dull, we’ll make navigation in a blog-like calendar fashion. Personally, I don’t think this is a perfect way for providing navigation (heck, I don’t think it’s even good, let alone perfect), but every blog has it… so we’ll make one too :).
Let’s first take a look at the final result :
Step 1 : Creating a Master Page
First thing we need to do is to create a Master page. I won’t get into too many details here, because there are tons of resources on using Master Pages, but I’ll point out some pecularities that you need to take into account when creating a Master Page for Sitefinity. Note : Make sure you put the code in separate file when creating a Master Page. So, let’s take a look at the Master Page file source code first :
The first important thing is that you need to replace the standard form tag with the CmsForm tag. You’ll also need to register the Telerik.Cms.Web namespace. Second thing, that you need to pay attention to, is mandatory div element that wraps everything you plan to put on your master page. This div needs to have it’s class attribute set to “cmsWrapper”.
Everything else is pretty straightforward.
Step 2 : Creating the calendar navigation controls
We’ll put our calendar navigation inside of the left sidebar div. As you can see, all you need to do is create a rad Calendar control and asp:panel control that will hold the links dynamically created based on which date user selected. Few more notes regarding the rad Calendar : make sure you disable multi select property, provide the name of the method that will handle selection changed and turn on autopostback property.
Step 3 : Creating code file for the master page
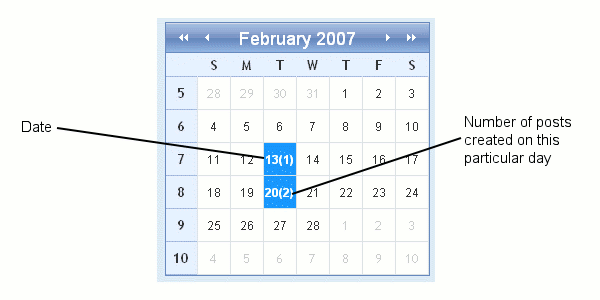
In this step we need to provide our navigation system with two functionalities. First we need to find all the dates on our current calendar view on which one or more posts have been created and replace the template for this cell with our custom template. Our template will look like a blue colored panel with the day and number of posts that were made on that day. See the image below.

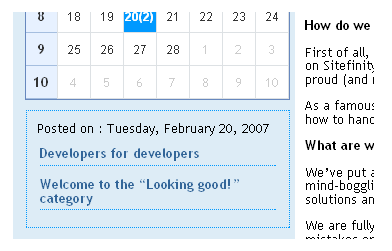
Second thing we need to take care of is the list of posts’ links. This list is dynamically created based on which date user selected. Take a look at the screenshot below to get a better idea.

Now that we know what we want to do, take a look at the code file that will take care of it.
Ahh.. where to start from? From the beginning, I guess.
First class in this file is the partial class for the Master Page. In the Page_Load method first thing we do is to determine the first and last date displayed currently on the calendar. Then we loop through those days and see if any of the pages have been created on any of these dates. In case we find a post that has been created on one of these days we add it to the numberOfPosts variable and keep going.
Then you can see that in case there are actually some posts written on that particular date we create a new instance of the PostsCell class, which is going to replace the standard calendar day cell. The PostsCell class inherits from a Control class and all we do there is add a panel and a label with modified display for the particular date (now it’s not just a date, but date with number of posts).
Back to our Page_Load method. The very last thing we do in this method is to create a new instance of a CalendarCellContentTemplate class and pass it the calendar instance, the date for which we want to create special day and instance of our PostsCell control. If you are unsure about this, you can find out more about it on telerik calendar reference (www.telerik.com) .
So we are only left with the calNavigation_SelectionChanged method. This method, oddly enough, handles the selection changed event of rad Calendar. As you can see from the code, we are doing something similar as in the Page_Load method. We loop through the pages and for all the pages that were created on the currently selected date we add a link to the pnlLinks control.
Pheww… I think that covers it pretty much.
Step 4 : Uploading the Master Page
This is simple. All you need to do is to go to Sitefinity and upload the newly created Master Page. In addition to this you could create new theme to go along with your Master Page, as I had, but that topic is beyond of the scope of this post. We’ll cover themes in one of the upcoming posts in this category.
Now apply the template created from the uploaded Master Page to any pages you wish and your done.
This was quite simple and straightforward, though I doubt that you will ever use it :). Nevertheless I think it was a nice excercise.

The Progress Team
View all posts from The Progress Team on the Progress blog. Connect with us about all things application development and deployment, data integration and digital business.
Comments
Topics
- Application Development
- Mobility
- Digital Experience
- Company and Community
- Data Platform
- Secure File Transfer
- Infrastructure Management
Sitefinity Training and Certification Now Available.
Let our experts teach you how to use Sitefinity's best-in-class features to deliver compelling digital experiences.
Learn MoreMore From Progress
Latest Stories
in Your Inbox
Subscribe to get all the news, info and tutorials you need to build better business apps and sites
Progress collects the Personal Information set out in our Privacy Policy and the Supplemental Privacy notice for residents of California and other US States and uses it for the purposes stated in that policy.
You can also ask us not to share your Personal Information to third parties here: Do Not Sell or Share My Info
We see that you have already chosen to receive marketing materials from us. If you wish to change this at any time you may do so by clicking here.
Thank you for your continued interest in Progress. Based on either your previous activity on our websites or our ongoing relationship, we will keep you updated on our products, solutions, services, company news and events. If you decide that you want to be removed from our mailing lists at any time, you can change your contact preferences by clicking here.


