Sitefinity 3.6 new backend architecture - How to navigate among views: What are commands?
The content you're reading is getting on in years
This post is on the older side and its content may be out of date.
Be sure to visit our blogs homepage for our latest news, updates and information.
[This post is part of the developer's manual preview published on this blog. You can find temporary TOC here.]
[This post has been updated after the feedback.]
As we have already mentioned in previous article, one does not use postback to change a view, but rather navigates to a specific url.
*** DEFINITION ***
Command is a URL that can be recognized by Sitefinity as an instruction to load specific view.
*** END DEFINITION ***
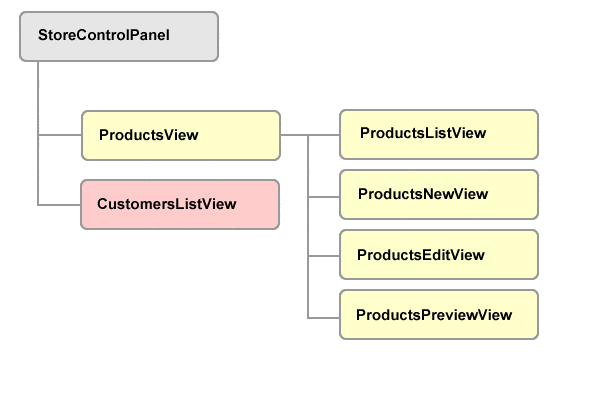
For the purpose of commands and navigating articles we have prepared very simple module that demonstrates how one can navigate between views. The module is called store module and has several views, which are arranged in a hierarchy as depicted by the following diagram.
If you wish, you can download the module from here and examine its code as we explain different approaches for navigating between Views.
CreateHostViewCommand function
As it has been mentioned in the introductory article for this topic, methods that start with Create will return you a command url which you can use then to assign it to the NavigateUrl property of the HyperLink for example.
Let us imagine that on the ProductsListView we have a HyperLink with title “Add new product”. When user clicks on the button, we would like Sitefinity to load ProductsNewView View. We can achieve that with a following line of code.
SAMPLE 1: CreateHostViewCommand returns proper command for a specified View
| this.AddNewProduct.NavigateUrl = CreateHostViewCommand<ProductNewView>(); |
CreateHostViewCommand is a generic method in this case and as its generic argument it receives the type of View for which the Command should be generated.
*** WARNING ***
CreateHostViewCommand and its overloads can be used only for generating commands to the views in the current hierarcy or route, as we will call it. For example, you can use CreateHostViewCommand in ProductsListView to generate commands for ProductNewView or ProductEditView, but not to generate command for CustomerListView.
*** END WARNING ***
NavigateHostViewCommand method
NavigateHostViewCommand is identical to the CreateHostViewCommand function except that this method won’t return a command url, but it will redirect user to the specified view. Generally, this method is used when user should be redirected to a new view after certain postback operation has been performed. Let’s take a look at the code that shows how we would use this method in the event handler that saves a product in our store module sample.
SAMPLE 2: Redirecting user to a new view after certain operation has been completed.
| void SaveProduct_Click(object sender, System.EventArgs e) |
| { |
| // TODO: perform saving and get the id of the newly saved product |
| Guid productId = new Guid("078074CB-FC9F-48d5-8EB8-F7CB170A591C"); |
| // navigate to the product preview and send product id as parameter |
| NavigateHostCommand<ProductPreviewView>(productId.ToString()); |
| } |
*** NOTE ***
You can see that we are putting an optional argument in the method call here, namely the parameter that we want to pass to the ProductPreviewView. We will explore this feature in more detail in the topics to come.
*** END NOTE ***
CreateRootViewCommand function and NavigateRootViewCommand method
We have already mentioned that you can use CreateHostViewCommand and NavigateHostViewCommand only when the view for which you are creating command or to which you are navigating are in the same hierarchy or route.
Sometimes, however, there is a need to jump between hierarchies. Let’s suppose that in our CustomersListView we have a link which can open the product that customer has bought. Obviously, since we have our ProductPreviewView ready and implemented, ideally we’d like to create command for that view and pass the product id as parameter. To achieve this we can use CreateRootViewCommand function as follows:
| // since we have decided to put accent on the navigation in this sample, we did not |
| // want to include any real data or data binding. The following you would generally do |
| // on ItemDataBound events of some grid or repeater. |
| Guid product1Id = new Guid("DFC2058E-C458-486c-A243-577528C51AA8"); |
| Guid product2Id = new Guid("8BB08866-E0AE-42c6-8DC3-6C59FF9039DD"); |
| // since ProductPreviewView is not part of the current route (or hierarchy), we will need to |
| // create a root command here - the command that starts from the root view - StoreControlPanel |
| this.ViewProduct1.NavigateUrl = CreateRootViewCommand(product1Id.ToString(), typeof (StoreControlPanel), |
| typeof (ProductsView), typeof (ProductPreviewView)); |
| this.ViewProduct2.NavigateUrl = CreateRootViewCommand(product1Id.ToString(), typeof(StoreControlPanel), |
| typeof(ProductsView), typeof(ProductPreviewView)); |
NavigateRootViewCommand is an equivalent of NavigateHostViewCommand but serves the same purpose as CreateRootViewCommand, namely enables you to navigate (jump) between hierarchies or routes.
The signature of the CreateRootViewCommand is different in so much that it takes any number of View types (in proper hierarchical order!) and generates a command to that View even if you are in a different hierarchy.
*** SAMPLE PROJECT ***
You can download a sample module that demonstrates the concepts that we’ve discussed in this article. To install the module, you will need Sitefinity 3.6. Once you have downloaded the files, paste the App_Code and ViewTemplates folders at the root of your website and run the website.
*** END SAMPLE PROJECT ***
ViewModeUserControl based Views - a different beast
Due to some specifics of User Controls, Views based on ViewModeUserControl classes have certain limitations in the way one navigates through them.
First limitation is that one cannot navigate to them using NavigateRootCommand or CreateRootCommand. Secondly, generic methods cannot be used when creating commands or navigating to Views based on ViewModeControls.
Generally speaking, one uses CreateHostViewCommand(string viewName, string parameter, string parenteId) method to create commands for Views. Navigation is done by redirecting to the created command.
SAMPLE 4: Creating a command for ViewModeUserControl based View
| cancel.NavigateUrl = CreateHostViewCommand("ProductsListView", null, null); |
SAMPLE 5: Navigating to a View based on ViewModeUserControl class
| Response.Redirect(CreateHostViewCommand("ProductPreviewView", productId.ToString(), null)); |
*** NOTE ***
We have plans to enhance the API for User Control based Views in the future versions and bring their functionality as close as possible to those of Custom Control based Views.
*** END NOTE ***
To illustrate these samples, we have prepared a sample project where Views are based on ViewModeUserControl base classes or in other words, Views are created from User Controls.
*** SAMPLE PROJECT ***
You can download the sample module with User Control based Views from here. To install the module, you will need Sitefinity 3.6. Once you have downloaded the files paste the App_Code and Views folders at the root of your website and run the website.
*** END SAMPLE PROJECT ***
The Progress Team
View all posts from The Progress Team on the Progress blog. Connect with us about all things application development and deployment, data integration and digital business.
Comments
Topics
- Application Development
- Mobility
- Digital Experience
- Company and Community
- Data Platform
- Secure File Transfer
- Infrastructure Management
Sitefinity Training and Certification Now Available.
Let our experts teach you how to use Sitefinity's best-in-class features to deliver compelling digital experiences.
Learn MoreMore From Progress


Latest Stories
in Your Inbox
Subscribe to get all the news, info and tutorials you need to build better business apps and sites