The power of structured user interface: How to implement a tooltip on all text fields in Sitefinity – at once
The content you're reading is getting on in years
This post is on the older side and its content may be out of date.
Be sure to visit our blogs homepage for our latest news, updates and information.
Table of contents
- Introduction
- Video of the final result
- Code walkthrough
- Installation instructions and code download
- What’s next
Introduction
It may come as a surprise to many of you that vast majority of Sitefinity user interface (among others, all modules) is actually data driven. Behind the scenes, all the different modules and functionality that you see is driven by a single engine that is modified through the structured data.
On the first through, this may seem as a completely irrelevant technical ego trip, but the implications of this design are far fetching. Namely, since the whole user interface is structured data it ought to be possible to manipulate this data in a programmatic way – and indeed, it is possible.
In this article, I will demonstrate how to change all the text fields of all the modules to display their “example” text as a tooltip, rather as a grayed out text underneath the textbox. So the transition we are looking forward is something like this:
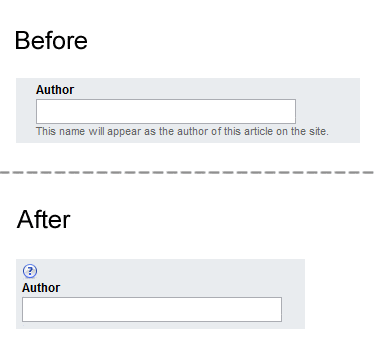
Figure 1: Before – with the example beneath the textbox; after – with the text visible upon hovering over the question mark image.
In this blog post, I want just to demonstrate the mechanics of this process. In one of the subsequent posts I will go deeper into the architecture of this engine, so don’t worry if not everything makes sense right now.
Video of the final result
In case you are curious how all this will look like once you install everything, you can take a look at the following video. Note that the custom page you’ll see together with the project is available for download from here.
You can take a look at the video here.
Code walkthrough
You can download the code from here in order to follow the explanations.
Remember that all controls you see in Sitefinity User Interface are so called Field controls and they all inherit from the base class FieldControl. The control whose functionality we wanted to change is called TextFieldControl (used for any kind of text input, except for Html input). Our task was to hide the example text below the textbox and show it inside of the tooltip instead. In order to do this I’ve created a new class and called it TooltipTextField and made it inherit from the TextField class. I’ve also created a new template and called it TooltipTextField.ascx and rewire the new field control to use that template instead. Inside of that template, you’ll notice I’m using RadToolTip (Telerik’s ASP.NET Ajax control that comes for free with Sitefinity 4.0 among with 100 other controls). I’ve also used some CSS to hide the label that was showing the example beneath the textbox.
Finally, I’ve overridden the ConstructControl() method, in order to set the Text property of the RadToolTip to the Example property of the TextField control. In addition to this, I also hide the question mark image if there if the Example property is not defined.
By doing this, I have created a new, modified, version of the TextField control. The next step is to use Sitefinity’s definition API to change all the instances of TextField control with the TooltipTextField control. The logic for this is done in the static class DefinitionManager.
The DefinitionManager class is doing a bit more actually. It provides you with a method to replace any kind of existing with any kind of new field for the specified module. You will notice there how I am traversing the hierarchy of the definitions engine to find the fields that I want to replace and finally replace them. I’ll go more in details on this in one of the subsequent posts.
Finally, there is the ChangeFields.aspx page that I’ve put in my website. This is just a sample of how to use the DefinitionManager class. You can examine it and modify as you see fit.
Installation instructions and code download
WARNING: This code is to be used only for experimenting. Do not use it on the actual projects unless you know what you are doing.
- Create a new website or use existing one and open it in Visual Studio
- Download the sample code from here and extract it in the directory of your choosing
- Open the extracted folder and copy files ChangeFields.aspx and ChangeFields.aspx.cs to root folder of your Sitefinity website
- Right-click on the Solution of your website in Visual Studio, then select “Add”, and then select “Existing project”. Navigate to the folder you have downloaded and extracted, open the folder “Telerik.Sitefinity.Samples.Definitions” inside of it and double click on Telerik.Sitefinity.Samples.Definitions.csproj file
- Add the reference to this project from your website
- Expand the references folder inside of this new project and fix all the broken references by pointing them to the bin folder of your Sitefinity website
- Build the site and start it
- Navigate to the ChangeFields.aspx page like in the video and change fields for any modules you’d like
- Refresh your Sitefinity website and examine how it affected your text fields
What’s next?
This blog post was intended to give you a grasp of how can the structured user interface in Sitefinity be used. I’ve tried to keep it light on the details and focused instead on the end result. If you are interested in this topic, I kindly invite you to read the very detailed post that I’ll be publishing soon on definitions, views and field controls. In that post I will provide a much deeper look at the whole structure of this engine, possibilities for extending and so on.
The Progress Team
View all posts from The Progress Team on the Progress blog. Connect with us about all things application development and deployment, data integration and digital business.
Comments
Topics
- Application Development
- Mobility
- Digital Experience
- Company and Community
- Data Platform
- Secure File Transfer
- Infrastructure Management
Sitefinity Training and Certification Now Available.
Let our experts teach you how to use Sitefinity's best-in-class features to deliver compelling digital experiences.
Learn MoreMore From Progress


Latest Stories
in Your Inbox
Subscribe to get all the news, info and tutorials you need to build better business apps and sites