Selecting Sitefinity 4 Content Inside Widget Designers
The content you're reading is getting on in years
This post is on the older side and its content may be out of date.
Be sure to visit our blogs homepage for our latest news, updates and information.
We’ve explored the different properties you can edit using Widget Designers, from editing basic widget properties to using AJAX Rad Controls. Today, we’ll see how it’s possible to add selectors for Sitefinity content in your widgets.
Sitefinity Fields
Although Sitefinity 4 currently does not include the web editors from 3.x such as page selectors, there are components you can use to bring this functionality to your widgets.
These are known as Field Controls, and with a little custom JavaScript, you can make use of them inside of your widgets.
Sample Widget
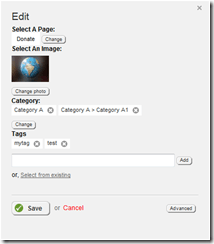
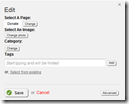
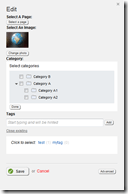
I’ve build a simple widget that uses these fields, adding it to the Non-Profit Starter Kit from the SDK. This widget doesn’t have any practical real-world use, but does demonstrate how fields can be used in a widget control designer.
Before we look at the individual fields, there’s a little bit of setup we need to perform to be able to use the fields in our widget.
FormManager
In order for many fields to function on your control designer, you must include a form manager on the template. Be sure your designer template includes the following control:
<sitefinity:FormManager ID="formManager" runat="server" />
Namespace
In addition, in order to reference the fields on your control designer, you need to reference the namespace that contains them:
<%@ Register Assembly="Telerik.Sitefinity" Namespace="Telerik.Sitefinity.Web.UI.Fields" TagPrefix="sf" %>
Accessing Template Controls
Sitefinity Widget Control Designers use templates for the public view. This means that they are loaded at runtime, and as such aren’t accessible in the designer class.
As you’ll see when we explore the fields, we need to be able to set some properties on these field controls, so we need a way to access them from the widget designer class. Fortunately, you can add simple accessor properties to the class for retrieving the controls from the associated template.
This snippet demonstrates how this is done. Notice the control types and names used, which match up to both the field types and IDs which we use on the control designer template.
protected PageField PageSelector
{
    get { return Container.GetControl<PageField>("PageSelector", true); }
}

protected ImageField ImageSelector
{
    get { return Container.GetControl<ImageField>("ImageSelector", true); }
}

protected HierarchicalTaxonField CategoriesSelector
{
    get { return Container.GetControl<HierarchicalTaxonField>("CategoriesSelector", true); }
}

protected FlatTaxonField TagsSelector
{
    get { return Container.GetControl<FlatTaxonField>("TagsSelector", true); }
}
ScriptDescriptors
We also need a way to reference the client-side version of the fields from the JavaScript designer file. This is done by using the GetScriptDescriptors method on your Control Designer class.
Simply add this method to your Control Designer class. Note that this requires the accessor properties defined above.
Also, because we are using the ClientIDs of the controls, I recommend you set these controls to use a ClientIDMode of Static to simplify naming.
/// <summary>
/// Gets a collection of script descriptors that represent ECMAScript (JavaScript) client components.
/// </summary>
/// <returns>
/// An <see cref="T:System.Collections.IEnumerable"/> collection of <see cref="T:System.Web.UI.ScriptDescriptor"/> objects.
/// </returns>
public override IEnumerable<ScriptDescriptor> GetScriptDescriptors()
{
    var descriptors = new List<ScriptDescriptor>(base.GetScriptDescriptors());
    var descriptor = (ScriptControlDescriptor)descriptors.Last();
    descriptor.AddComponentProperty("PageSelector", this.PageSelector.ClientID);
    descriptor.AddComponentProperty("ImageSelector", this.ImageSelector.ClientID);
    descriptor.AddComponentProperty("CategoriesSelector", this.CategoriesSelector.ClientID);
    descriptor.AddComponentProperty("TagsSelector", this.TagsSelector.ClientID);
    return descriptors;
}
Now you can access these controls from the associated JavaScript file for the control designer. They are wired up automatically with get/set properties following the naming convention of
get_[controlname] and set_[controlname].
Here is what the JavaScript file looks like with these properties added. Note the backing fields are defined in the InitializeBase while the get/set methods are defined in the prototype.
Type.registerNamespace("SitefinityWebApp.Widgets.FieldsWidget");

SitefinityWebApp.Widgets.FieldsWidget.FieldsWidgetDesigner = function (element) {
    SitefinityWebApp.Widgets.FieldsWidget.FieldsWidgetDesigner.initializeBase(this, [element]);

    this._PageSelector = null;
    this._ImageSelector = null;
    this._CategoriesSelector = null;
    this._TagsSelector = null;
    this._resizeControlDesignerDelegate = null;
}


SitefinityWebApp.Widgets.FieldsWidget.FieldsWidgetDesigner.prototype = {
    // other methods ommitted ...

    // Page Selector
    get_PageSelector: function () {
        return this._PageSelector;
    },
    set_PageSelector: function (value) {
        this._PageSelector = value;
    },

    // Image Selector
    get_ImageSelector: function () {
        return this._ImageSelector;
    },
    set_ImageSelector: function (value) {
        this._ImageSelector = value;
    },

    // Categories Selector
    get_CategoriesSelector: function () {
        return this._CategoriesSelector;
    },
    set_CategoriesSelector: function (value) {
        this._CategoriesSelector = value;
    },

    // Tags Selector
    get_TagsSelector: function () {
        return this._TagsSelector;
    },
    set_TagsSelector: function (value) {
        this._TagsSelector = value;
    },

    _resizeControlDesigner: function () {
        setTimeout("dialogBase.resizeToContent()", 100);
    }
}

SitefinityWebApp.Widgets.FieldsWidget.FieldsWidgetDesigner.registerClass('SitefinityWebApp.Widgets.FieldsWidget.FieldsWidgetDesigner', Telerik.Sitefinity.Web.UI.ControlDesign.ControlDesignerBase);
if (typeof (Sys) !== 'undefined') Sys.Application.notifyScriptLoaded();
For more on script descriptors, take a look at this article from MSDN: Adding Client Capabilities to a Web Server Control.
Now that we’ve got everything in place for our designer to use and save these field properties, let’s take a closer look at the controls themselves.
Fields
The complete sample is available for download below, but here is a brief run through the different fields and how they are added to the widget.
For more information on the different components of the widget (Designer, JavaScript file, etc.) be sure to read the previous article: Anatomy of a Sitefinity 4 Widget.
PageField
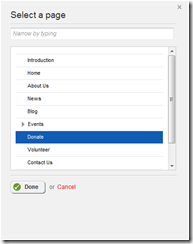
This field allows you to select a Sitefinity page, which is persisted using its Id. This is the simplest field to implement, as it only requires that you define a Guid property on the Widget:
/// <summary>
/// Gets or sets the ID of the selected page.
/// </summary>
/// <value>
/// The selected page ID.
/// </value>
public Guid SelectedPageID { get; set; }
as well as the field itself on the control designer: Note the Web Service and Display Mode properties used.
<sf:PageField ID="PageSelector" runat="server" WebServiceUrl="~/Sitefinity/Services/Pages/PagesService.svc/" DisplayMode="Write" />
The field needs to know where the root of the pages to display. This can be easily set in the Widget Designer class by using static property in the Sitefinity Initializer. Add this to the Page_Load method of the designer class.
PageSelector.RootNodeID = Telerik.Sitefinity.Abstractions.SiteInitializer.FrontendRootNodeId; Next, wire up the Widget property to the designer using the associated JavaScript file. This needs to be done both in the refreshUI method:
refreshUI: function () {
    // load selected page
    var data = this._propertyEditor.get_control();
    var p = this.get_PageSelector();
    var pageid = data.SelectedPageID;
    if (pageid) p.set_value(pageid);
}
as well as saving the selected value back to the widget in the applyChanges method.
applyChanges: function () {
    // save selected page
    var controlData = this._propertyEditor.get_control();
    controlData.SelectedPageID = this.get_PageSelector().get_value();
}
Finally, we’ll add a hyperlink to the actual public widget:
<p><asp:HyperLink ID="PageLink" runat="server" /></p>
and bind that value to the selected page using the Sitefinity Fluent API (you could also use the PageManager if you prefer).
using (var api = App.WorkWith())
{
    // get selected page info
    var page = api.Pages().Where(p => p.Id == SelectedPageID).Get().FirstOrDefault();
    if (page != null)
    {
        PageLink.NavigateUrl = ResolveUrl(page.GetFullUrl());
        PageLink.Text = page.Title;
    }
}
ImageField
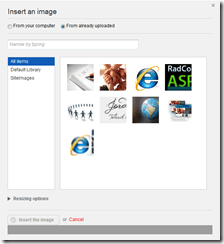
This is a powerful field control that not only allows you to select an image to be used on your widget, but allows you to upload directly to your library.
<sitefinity:ImageField ID="ImageSelector" runat="server" DisplayMode="Write" UploadMode="Dialog" DataFieldName="Image" />
The ImageField works in three different modes: ContentLink, Guid, and String.
ContentLink requires that you work with Image objects, either through a web service or your own JSON, and is designed mostly for use internally (such as within module definitions).
Guid is simpler, and operates similarly to the PageField. However, it doesn’t integrated easily into a widget since it doesn’t automatically update the selected image. This means you don’t get a preview of the selected image in your widget.
So instead, we will use the String mode, which stores the URL of the selected image. To tell the field to work in this mode, add the following to the Page_Load method of your Control Designer class.
ImageSelector.DataFieldType = typeof(String);
Important Note: the value persisted in string mode is the full url to the image, including the host name. So if you are working in a development or staging environment, you might get a url that begins with http://localhost. Be sure to update your widget properties when deploying to production.
The rest of the setup for ImageField is similar to PageField, so it is omitted here. Please take a look at the sample project below for the complete implementation.
HierarchicalTaxonField (Categories)
Sitefinity also has two fields for selecting taxonomy. The HierarchicalTaxonField allows you to select categories, as well as any other custom, hierarchical taxonomy type.
<sitefinity:HierarchicalTaxonField ID="CategoriesSelector" runat="server" DisplayMode="Write" Expanded="false" ExpandText="ClickToAddCategories"
    ShowDoneSelectingButton="true" AllowMultipleSelection="true" BindOnServer="false" TaxonomyMetafieldName="Category"
    WebServiceUrl="~/Sitefinity/Services/Taxonomies/HierarchicalTaxon.svc" />
We need to tell this field which Taxonomy to use. In our example, we are using the Category taxonomy, which fortunately has a constant you can use for convenience. Set this in the Page_Load of the Control Designer class.
CategoriesSelector.TaxonomyId = TaxonomyManager.CategoriesTaxonomyId; Because we are allowing multiple categories to be selected, we need a property in our widget to persist an array of Guid items.
/// <summary>
/// Gets or sets the selected categories.
/// </summary>
/// <value>
/// The selected categories.
/// </value>
public Guid[] SelectedCategories
{
    get
    {
        if (selectedCategories == null) selectedCategories = new Guid[] { };
        return selectedCategories;
    }
    set { selectedCategories = value; }
}

private Guid[] selectedCategories;
However, we also need a way to serialize this array to and from the JavaScript used by the designer. While we could probably implement a custom serializer, I found an easier way using the split() and join() methods of the string class.
When retrieving the array, I convert it to a comma-delimited string of Guids. To set the value, I do the reverse, splitting a comma-delimited string of Guids into an array.
/// <summary>
/// Intermediary property for passing categories to and from the designer
/// </summary>
/// <value>
/// The category value as a comma-delimited string.
/// </value>
public string CategoryValue
{
    get { return string.Join(",", SelectedCategories); }
    set
    {
        var list = new List<Guid>();
        if (value != null)
        {
            var guids = value.Split(',');
            foreach (var guid in guids)
            {
                Guid newGuid;
                if (Guid.TryParse(guid, out newGuid))
                    list.Add(newGuid);
            }
        }
        SelectedCategories = list.ToArray();
    }
}
So now in the JavaScript, instead of serializing and deserializing an array of Guid, we simply use the string value and split/join it on either side.
For the refreshUI method we split the string:
// load categories
var c = this.get_CategoriesSelector();
var cats = data.CategoryValue;
if (cats != null)
    c.set_value(data.CategoryValue.split(","));
and on applyChanges we join the array back to a string:
// save selected categories
var c = this.get_CategoriesSelector();
var cats = c.get_value();
if (cats != null)
    controlData.CategoryValue = c.get_value().join();
If you wanted to disable multiple-item selection, you would handle the Guid in a similar fashion as the PageField.
FlatTaxonField (Tags)
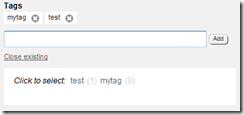
The last field demonstrated is used for selecting Tags in your widget. This is a helpful field as it not only allows you to select from existing tags, complete with a nifty auto-complete textbox; it also allows you to add new tags on the fly.
Important Note: notice that for this control, we have to hard-code the taxonomy ID for Tags. This is due to a known issue with the field when used outside of a definition such as a module.
<sitefinity:FlatTaxonField ID="TagsSelector" runat="server" DisplayMode="Write" WebServiceUrl="~/Sitefinity/Services/Taxonomies/FlatTaxon.svc/cb0f3a19-a211-48a7-88ec-77495c0f5374"
    TaxonomyMetafieldName="Tags" AllowMultipleSelection="true" Expanded="false" Title="Tags" />
There is also a static helper property for the Tags Taxonomy ID.
TagsSelector.TaxonomyId = TaxonomyManager.TagsTaxonomyId; The remaining setup of the FlatTaxonField is similar to the HierarchicalTaxonField, including the intermediary property for passing the array of Guid.
See the downloadable example below for the complete implementation.
Resize Events
To improve the user experience for your widget designer, it’s a good idea to have it resize as needed so that users don’t have to scroll to set some of the properties.
Fortunately, you can hook into many of the events fired by the different fields and attach a custom handler that calls the dialogBase.resizeToContent() method.
Some of the fields expose specific methods for adding custom handlers. Others need to be wired up manually to the internal buttons. Here is the code that sets this up for our designer:
// resize on Page Select
var s = this.get_PageSelector();
s.add_selectorOpened(this._resizeControlDesigner);
s.add_selectorClosed(this._resizeControlDesigner);

// resize control designer on image selector load
var i = this.get_ImageSelector();
this._resizeControlDesignerDelegate = Function.createDelegate(this, this._resizeControlDesigner);
$addHandler(i._replaceImageButtonElement, "click", this._resizeControlDesignerDelegate);

// resize control designer on image selector mode toggle
var d = i._asyncImageSelector._dialogModesSwitcher;
d.add_valueChanged(this._resizeControlDesigner);

// resize control designer on image selector cancel
var a = i._asyncImageSelector._cancelLink;
$addHandler(a, "click", this._resizeControlDesignerDelegate);

// resize control designer on image selector save
var s = i._asyncImageSelector._saveLink;
$addHandler(s, "click", this._resizeControlDesignerDelegate);

// resize control designer on image upload
i._asyncImageSelector.get_uploaderView().add_onFileUploaded(this._resizeControlDesigner);

// resize control designer on tag selector open
var t = this.get_TagsSelector();
var tsb = t.get_selectFromExistingButton();
$addHandler(tsb, "click", this._resizeControlDesignerDelegate);

// resize control designer on tag selector close
var tcb = t.get_closeExistingButton();
$addHandler(tcb, "click", this._resizeControlDesignerDelegate);

// resize control designer on category selector close
var c = this.get_CategoriesSelector();
var cs = c.get_taxaSelector();
cs.add_selectionDone(this._resizeControlDesigner);

// resize control designer on category selector open]
var csb = c.get_changeSelectedTaxaButton();
$addHandler(csb, "click", this._resizeControlDesignerDelegate);
In this case, I’ve set the resize method on a timer, to ensure that it fires after the various dialogs open or close.
_resizeControlDesigner: function () {
        setTimeout("dialogBase.resizeToContent()", 100);
    }
For the complete implementation and to see how everything is wired up, take a look at the complete example, available for download below.
Wrapping Up
Field controls are a great way to hook into existing Sitefinity content from your custom widgets. It is even possible to create custom fields and use them, adding quicker, more native editors to your widgets. For an example of that, take a look at this new KB article: Implementing a custom color picker field control.
Take a moment to download the example project below and try using the fields in your projects. As always, report any feedback, comments, suggestions or questions to our Developing with Sitefinity discussion forum so that we can continue to enhance and improve your experience.
Downloads

The Progress Team
View all posts from The Progress Team on the Progress blog. Connect with us about all things application development and deployment, data integration and digital business.
Comments
Topics
- Application Development
- Mobility
- Digital Experience
- Company and Community
- Data Platform
- Secure File Transfer
- Infrastructure Management
Sitefinity Training and Certification Now Available.
Let our experts teach you how to use Sitefinity's best-in-class features to deliver compelling digital experiences.
Learn MoreMore From Progress
Latest Stories
in Your Inbox
Subscribe to get all the news, info and tutorials you need to build better business apps and sites
Progress collects the Personal Information set out in our Privacy Policy and the Supplemental Privacy notice for residents of California and other US States and uses it for the purposes stated in that policy.
You can also ask us not to share your Personal Information to third parties here: Do Not Sell or Share My Info
We see that you have already chosen to receive marketing materials from us. If you wish to change this at any time you may do so by clicking here.
Thank you for your continued interest in Progress. Based on either your previous activity on our websites or our ongoing relationship, we will keep you updated on our products, solutions, services, company news and events. If you decide that you want to be removed from our mailing lists at any time, you can change your contact preferences by clicking here.
