Working with RESTful Services Part 2 – Claims Authentication and Designing Service Calls
The content you're reading is getting on in years
This post is on the older side and its content may be out of date.
Be sure to visit our blogs homepage for our latest news, updates and information.
In the past we have discussed the nuts and bolts of client-side programming and specifically using Sitefinity’s WCF Restful API. You can find an introduction to the topic in this blog post. Here we are going to cover a few new and more advanced topics and provide an updated code sample to help you get started with your work. Here are the topics that we will discuss:
- How can RESTful services work with Claims Authentication
- How to design service calls and debug them
- Common errors and questions
RESTful services and Claims Authentication
Claims Authentication has been introduced as the default authentication mode with Sitefinity 5.0. It’s your choice as to which authentication type you would use and we have kept Forms support to ensure backward compatibility. You can change the authentication mode at any point in time and I personally would recommend switching to Claims Authentication in case you don’t have any code reliant on Forms - a nice benefit of it is that it allows you to do more interesting things like Single Sign On and Windows Authentication. Rule of thumb is that if you have created your project on Sitefinity 4.x and upgraded to 5.x you are still using Forms Authentication, unless you explicitly switch to Claims. For more information on the authentication modes you can check the following article.
If you review the last blog post on services and the code sample provided you will see that the interesting part is where we authenticated with Sitefinity via RESTFul service. There we made a call towards a service with a specific URL (~/Sitefinity/Services/Security/Users.svc/authenticate) and passed our username and password. This then verified our identity and set an authentication cookie that we pass around with our requests. This hasn't changed with the newer versions and if you are using Forms authentication this is the way you would authenticate.
With the notion of Claims the mechanism that you need to implement looks similar in code, but it has conceptual differences.
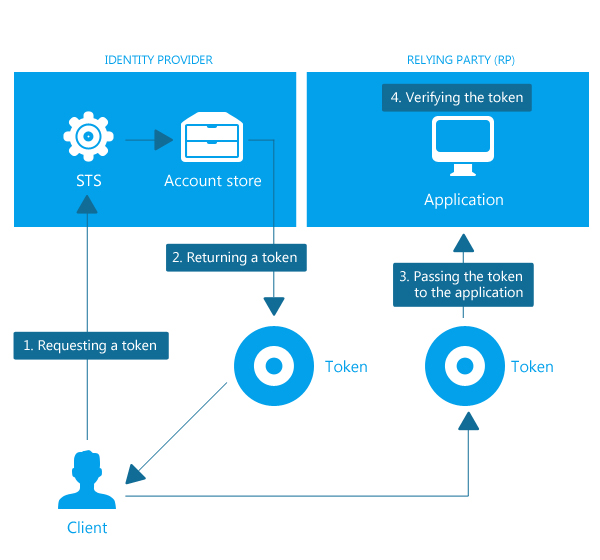
In order to log in, you make a call to a specific URL and pass the username and password. What this URL points to is your Security Token Service (STS). An STS is simply something that is responsible for handling the issuing of the so called Claims.
In a nutshell - if I claim to be a user with the username Svetla and there is mutual trust between my application and the STS, then STS verifies my claim against the account store(in our case the membership provider) and tells my application that my claim is in fact correct - i am username:svetla and my application lets me do my work because now my requests are signed with a token indicating who I am.
You may be wondering where this STS is. By default the logic is integrated in your Sitefinity application and can be found under ~/Sitefinity/SWT. In some cases it may be detached from the site itself and multiple sites can rely on a single STS. For instance it can be a website where you have deployed SitefinitySTSWebApp (this is how you configure Windows Authentication). In our example we are looking into the default case and using the /Sitefinity/SWT as the security token issuer.
Here is a graphic explaining this mechanism. In our case the STS is the authentication URL (~/Sitefinity/SWT) we are using, it verifies our identity against the membership provider and returns a token.

Now each time when we make the call in order to log in this automatically sets our security token once our identity is validated by the STS. We can check whether this has been successful via code as well and you can see this in our code sample. From then on the logic looks quite the same as with Forms Based Authentication. We continue passing our cookies with the requests in order to be authorized do the necessary service calls in our client application, only this time the cookies include our token signed by the STS.
How this works in the code sample
This is best explained in example and we have provided a code sample, which you can find linked at the end of this blog post. The sample is improved to illustrate working with the new authentication mode. Authentication is exposed through an interface with the following methods:
bool SignIn (string username, string password, string Url); void SetCredentials(string username, string password); bool SignOut(); void CallService(string serviceUrl, byte[] inputData, string httpMethod, out string responseBody, string contentType=""); HttpStatusCode Request(string url, out string responseBody, out WebHeaderCollection responseHeaders, byte[] data = null, string httpMethod = "GET", string contentType = "application/json", NameValueCollection requestHeaders = null);
Two implementations of this interface have been introduced (ClaimsAuthenticationHelper and FormsAuthenticationHelper) and each of these methods is implemented with the specifics of the authentication mechanism at hand. This allows you to change at run-time the authentication mode you want to be working with and I have illustrated this with a drop-down selector for our authentication modes in the client app.
Designing Advanced Service Calls
Now that we can authenticate we have the bigger task at hand.
When we design our client application we usually have a particular use case in mind and we want our client to perform a certain set of tasks. They almost always do go beyond the basic CRUD operations and can contain tasks like batch creating a set of admin users for each new site, preparing some boilerplate structure for your sites, reading information about widgets on a page and updating some of them. In all those cases I always like to use an important cheat sheet - Sitefinity itself. Here are two tips that can help you successfully implement the code that would talk with Sitefinity's RESTful services.
Tip 1: Sitefinity is the biggest RESTful Client for Sitefinity and this can help you design your service calls
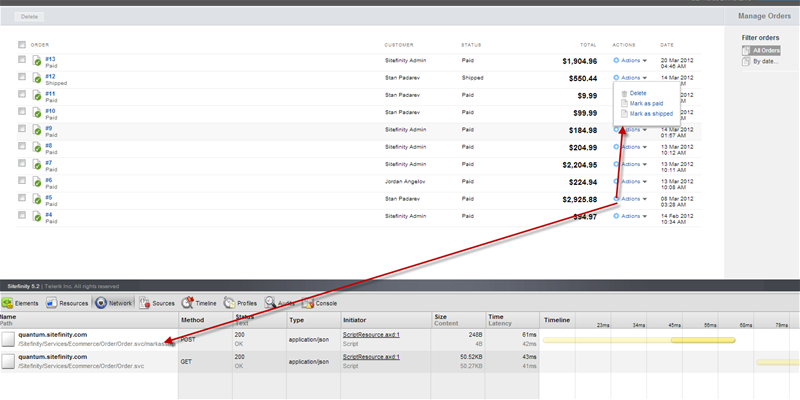
Having this in mind you can easily mimic any task in Sitefinity and inspect what services are being called and how. To try this out click around the back-end with the Network Tab or Fiddler turned on and you will see how Sitefinity invokes RESTful services for all operations in the back-end and gives you the URL, HTTP Method, HTTP Headers and JSON payload. Now when designing a service call this can serve us as great reference. All we need to do is click around and follow the steps that we want our client to perform and we will get an exact parameters we need to pass.

From there on you can review the help page of the service and all it's methods and even copy the URL directly in your own code.
Tip 2: Creating the Model classes in your client using the JSON that our inspection detects
OK, so we are in a situation where we know the exact URL, HTTP method and even some example JSON payload. We also need to perform some sort of CRUD operation(creating a product for instance). We have seen in the previous example that we can use just a part of the information Sitefinity sends over and just provide the properties we care about. For example in our News List we only care to list the titles of all the news articles and don’t need properties like the Author, Summary, Date Modified, Id etc. and therefore we create a NewsItems class with only one property - Title - and use it to deserialize the json returned by the service.
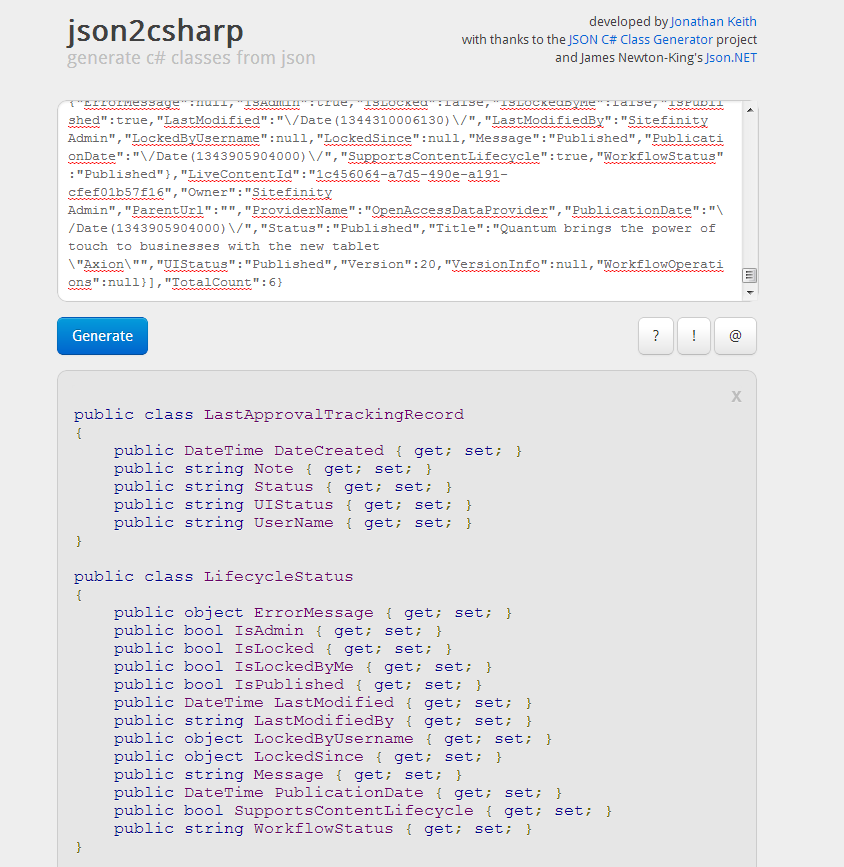
But in some cases you want to serialize or deserialize more information and there is a neat shortcut provided by a tool called JSON 2 Sharp. In this tool you can paste the JSON that the network or Fiddler inspection showed as the data sent to Sitefinity and it will generate a nice looking class with all the properties of the object or collection we are going to manipulate(most times you don’t need all of those properties, but you can further review this class). The tool has certain issues with the naming convention (you would probably like to rename the classes called Item and RootObject) but it provides an easy to set up skeleton for your model

You can then use this class and work with it in your client app and either deserialize a sitefinity response in objects of the RootObject class (or whatever you renamed it to) or serialize these objects into json to make a PUT or post requests.
Debugging Service Errors
Through the process of developing a Client app it’s always useful to know the common errors and one of the best tools you can use for this is once again the HTTP Debugging Proxy Fiddler. It allows you to look into your HTTP traffic and inspect the error codes and HTTP responses. The other benefit of having used Sitefinity to design your services then you will have two HTTP calls to compare. We have tried to copy an actual action in Sitefinity so you would have a successful request to compare the request you are trying to make through your application. You can even use Fiddler to directly see the diffs between requests (documentation) and get a quick indication of what is missing or not formatted correctly. Here are some examples of common errors that seem to come up and the reasons for them. The text shown in brackets is the text displayed in the service response, usually as a part of an HTML error message.
HTTP 403 (User Already Logged In)
This is probably the easiest one to look into. It indicates that you haven’t logged out the user from the browser, Sitefinity Thunder, Lighting or another application.
HTTP 500 (End element 'root' from namespace '' expected)
These come in different variations and the namespace can be different. This is a WCF specific error that mostly occurs when you are trying to make an Update or Create operation and usually indicates that the JSON you are sending to the server is not the formatting that Sitefinity expects. The best way to troubleshoot this is by comparing traffic using Fiddler to see if there is anything different with the HTTP request or use any comparison tool to see if there is some specifics in your serialized JSON that somehow don’t play well with Sitefinity.
HTTP 500 (There was an error checking start element of object of type …)
This usually occurs when content type is not properly set to application/json. It is good to always make sure to always set the correct HTTP headers for your content type.
Sample Client Application
All of the items above are illustrated in sample code. As mentioned this picks up from the previous Winfroms Application provided in the last blog post and adds support for Claims and Forms and the ability to change them on runtime. It also illustrates the idea of more complete model classes generated using JSON2CSharp along with the creation of a product – a sample task we get a lot of questions on.
We have provided the code and any future updates on GitHub and you can find it here.
The code is arranged in such a way that the authentication helpers and model classes can be easily taken out of the Winforms App and incorporated in your application so that you can reuse them.
Happy Coding in 2013!

The Progress Team
View all posts from The Progress Team on the Progress blog. Connect with us about all things application development and deployment, data integration and digital business.
Comments
Topics
- Application Development
- Mobility
- Digital Experience
- Company and Community
- Data Platform
- Secure File Transfer
- Infrastructure Management
Sitefinity Training and Certification Now Available.
Let our experts teach you how to use Sitefinity's best-in-class features to deliver compelling digital experiences.
Learn MoreMore From Progress
Latest Stories
in Your Inbox
Subscribe to get all the news, info and tutorials you need to build better business apps and sites
Progress collects the Personal Information set out in our Privacy Policy and the Supplemental Privacy notice for residents of California and other US States and uses it for the purposes stated in that policy.
You can also ask us not to share your Personal Information to third parties here: Do Not Sell or Share My Info
We see that you have already chosen to receive marketing materials from us. If you wish to change this at any time you may do so by clicking here.
Thank you for your continued interest in Progress. Based on either your previous activity on our websites or our ongoing relationship, we will keep you updated on our products, solutions, services, company news and events. If you decide that you want to be removed from our mailing lists at any time, you can change your contact preferences by clicking here.

