Facebook, C# Sitefinity Integration
The content you're reading is getting on in years
This post is on the older side and its content may be out of date.
Be sure to visit our blogs homepage for our latest news, updates and information.
Facebook offers a C# API that allows you to display a friend list on your website. To implement this within Sitefinity, you must obtain a Facebook user account, obtain a Facebook API Key, download the Facebook SDK, bind a Repeater to your friend list, and upload this functionality as a user control, or create an external page as shown in this article, to Sitefinity.
Getting Started
Here is what you need to get started:
1. First, you must obtain a Facebook user account and add some friends. This can be done on Facebook's website.
2. Once that is complete, you must obtain an Developer API and Secret key by going to Facebook's developer website API Key generator. If you have not logged in, you will be asked for your user name and password prior to getting the key generated. Add the name of your application to that form. You will then see a the API and Secret Key on the next screen.
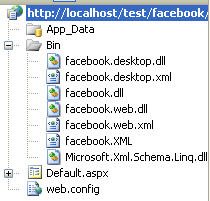
3. Download the Facebook SDK and place all of the files in the bin folder of your application.
You application should look like this:
Authenticating to Facebook
Application users must login to Facebook before using an application. In your default.aspx page, as shown above, you must create a method to authenticate your user as shown below:
| /// <summary> |
| /// Returns the user's authentication token |
| /// </summary> |
| /// <returns></returns> |
| private facebook.Components.FacebookService AuthenticateMe() |
| { |
| facebook.Components.FacebookService _fbService = new facebook.Components.FacebookService(); |
| // ApplicationKey and Secret are acquired when you sign up for an |
| //application |
| _fbService.ApplicationKey = ConfigurationManager.AppSettings.Get("APIKey"); |
| _fbService.Secret = ConfigurationManager.AppSettings.Get("Secret"); |
| _fbService.IsDesktopApplication = false; |
| string sessionKey = Session["Facebook_session_key"] as String; |
| // When the user uses the Facebook login page, the redirect back |
| // here will have the auth_token in the query params |
| string authToken = Request.QueryString["auth_token"]; |
| // We have already established a session on behalf of this user |
| if (!String.IsNullOrEmpty(sessionKey)) |
| { |
| _fbService.SessionKey = sessionKey; |
| _fbService.uid = (long)Session["Facebook_userId"]; |
| } |
| // This will be executed when Facebook login redirects to our page |
| elseif (!String.IsNullOrEmpty(authToken)) |
| { |
| _fbService.CreateSession(authToken); |
| Session["Facebook_session_key"] = _fbService.SessionKey; |
| Session["Facebook_userId"] = _fbService.uid; |
| Session["Facebook_session_expires"] = _fbService.SessionExpires; |
| } |
| // Need to login |
| else |
| { |
| Response.Redirect(@"http://www.Facebook.com/login.php?api_key=" + _fbService.ApplicationKey + @"&v=1.0\"); |
| } |
| return _fbService; |
| } |
In your Web.config, you must provide the API, Secret Key and Callback URL for authentication:
| <appSettings> |
| <add key="APIKey"value="xxxxx"></add> |
| <add key="Secret"value="xxxxx"></add> |
| <add key="Callback"value="http://localhost/test/facebook/"></add> |
| </appSettings> |
The Callback is where your user goes after he or she authenticates to Facebook using your application. In this case, the value is the location of my virtual directory for this project.
Binding the Data
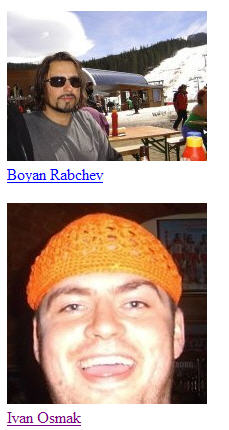
I will bind a repeater to my Facebook buddy list. To shorten the list of friends, I will create a buddy list. This is a subset of friends on my Facebook profile. I will use Boyan and Ivan who are Sitefinity bloggers.
To create the list, follow these steps:
1. Login to your Facebook account
2. On the top navigation, click Friends
3. Click Create New List
4. To add friends, click Edit this List
5. Follow the on-screen instructions
6. From the query string, copy and paste the list ID as shown below in bold:
http://www.facebook.com/developers/createapp.php#/friends/?filter=flp_572701214029
7. Bind a Repeater called Repeater1 to the data as shown below:
Default.aspx.cs
| using facebook.web; |
| protectedvoid Page_Load(object sender, EventArgs e) |
| { |
| facebook.Components.FacebookService _fbService = AuthenticateMe(); |
| if (!IsPostBack) |
| { |
| // Bind a repeater to a list of friends, based on a special friend list |
| //Remove anything in between .getUserObjects() to get a list of all friends for a user |
| Repeater1.DataSource = _fbService.friends.getUserObjects(572701275029); |
| //To get a list of fields, get each user instance as shown below |
| //foreach (user u in _fbService.friends.getUserObjects()) |
| //{ |
| // |
| //} |
| Repeater1.DataBind(); |
| } |
| } |
Default.aspx
| <asp:Repeater ID="Repeater1"runat="server"> |
| <ItemTemplate> |
| <asp:Image ID="Image1"runat="server"ImageUrl='<%# DataBinder.Eval(Container.DataItem, "pic_big") %>'/> |
| <br /> |
| <asp:HyperLink ID="Name"runat="server"Text='<%# DataBinder.Eval(Container.DataItem, "Name") %>'NavigateUrl='<%# Eval("UID", "http://www.facebook.com/profile.php?id={0}&ref=profile") %>'Target="_blank"/> |
| <br /> |
| <br /> |
| </ItemTemplate> |
| </asp:Repeater> |
Once code has been implemented, your end result would look something like this:
Sitefinity Integration
From here, you could create an External Page from the default.aspx file. For more info, please read Working with Pages > External Pages in our User Manual. You could also copy and paste the page's contents into a user control and upload it to Sitefinity.
The Progress Team
View all posts from The Progress Team on the Progress blog. Connect with us about all things application development and deployment, data integration and digital business.
Comments
Topics
- Application Development
- Mobility
- Digital Experience
- Company and Community
- Data Platform
- Secure File Transfer
- Infrastructure Management
Sitefinity Training and Certification Now Available.
Let our experts teach you how to use Sitefinity's best-in-class features to deliver compelling digital experiences.
Learn MoreMore From Progress


Latest Stories
in Your Inbox
Subscribe to get all the news, info and tutorials you need to build better business apps and sites