Forward Mapping, Open Access and Sitefinity
The content you're reading is getting on in years
This post is on the older side and its content may be out of date.
Be sure to visit our blogs homepage for our latest news, updates and information.
In a future release, Telerik's new OpenAccess ORM, which was recently acquired from Vanatec, will replace Nolics as Sitefinity's official ORM. One of Nolics advantages over many ORMs was forward mapping, which allowed the developer to make database tables from classes. This feature is also supported by OpenAccess and the process involves creating a class with the persistent attribute, adding public properties within the class, and creating a web application with a data bound tool.
To use forward mapping, you must enable your project to use OpenAccess by following these steps:
1. Create a new class library project and give it a name
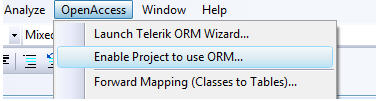
2. In the solution explorer, click on the class library that you have created. On the top menu, click on Open Access > Enable Project to use ORM as shown below this sentence:
3. On page 1 and 2 of the wizard, click next
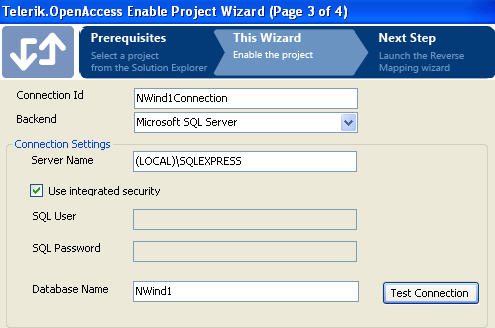
4. On page 3, complete your connection information. The first textbox is just a connection same, so it can be anything you like. The last textbox is the actual name of the database. Here is an example of what your screen could look like:
5. Click next and on the last page, click finish
6. Open the solution explorer and click on the class library
7. Press F4 and a properties menu will show. Change the update database property to true as shown below this sentence:
This will tell OpenAccess to update your database schema, based on the class, during each project build. Now, you must create a class to be mapped to the database by following these instructions:
8. In your class library, delete the Class1.cs file
9. Add a new class called ProductTable.cs
10. In the using section, add this line of code:
using Telerik.OpenAccess;
11. Add the following line of code above the ProductTable class:
[Telerik.OpenAccess.Persistent]
public class ProductTable
12. This line of code will tell OpenAccess to create a table in the database called ProductTable. For more info on persistence, please read this article.
13. Inside the class, add public properties for each column name you would like.
Create a public property for your identity column and use the forward mapping wizard to establish single identity as shown below this sentence:
For more info on single identity, please refer to this article. Your code should now look like this:
| namespace Forward12122008 |
| { |
| [Telerik.OpenAccess.Persistent(IdentityField = "_productIdentity")] |
| publicclass ProductTable |
| { |
| //Open Access requires a no-args constructor |
| public ProductTable() { } |
| privatestring _productName; |
| privatedecimal _price; |
| privatestring _description; |
| privateint _sku; |
| privateint _productIdentity; |
| publicint ProductIdentity |
| { |
| get |
| { |
| return _productIdentity; |
| } |
| set |
| { |
| _productIdentity = value; |
| } |
| } |
| publicstring ProductName |
| { |
| get |
| { |
| return _productName; |
| } |
| set |
| { |
| _productName = value; |
| } |
| } |
| publicdecimal Price |
| { |
| get |
| { |
| return _price; |
| } |
| set |
| { |
| _price = value; |
| } |
| } |
| publicstring Description |
| { |
| get |
| { |
| return _description; |
| } |
| set |
| { |
| _description = value; |
| } |
| } |
| publicint SKU |
| { |
| get |
| { |
| return _sku; |
| } |
| set |
| { |
| _sku = value; |
| } |
| } |
| } |
| } |
14. Build the project by pressing Ctrl + F5.
Now that this is set-up, you can set-up a RadGrid, for example, to insert, update, delete or read information. OpenAccess uses a data source control similar to the SQLDataSource and LINQDataSource controls, so in many scenarios you can bind data with limited lines of code. For more info on using the OpenAccessDataSource control, please refer to this blog post.
When binding data to the RadGrid, ensure that the DataKeyNames property is set to the name of your ID column. In the ProductTable class, that field’s name is ProductIdenity and that property can be set on the RadGrid by going to MasterTableView > DataKeyNames. More detailed instructions on using the RadGrid to bind data can be found in the RadControls for ASP.NET AJAX self-paced tutorial.
Once you create your data-bound control, you can easily upload it as a user control to Sitefinity. For more info, please read this article.
The Progress Team
View all posts from The Progress Team on the Progress blog. Connect with us about all things application development and deployment, data integration and digital business.
Comments
Topics
- Application Development
- Mobility
- Digital Experience
- Company and Community
- Data Platform
- Secure File Transfer
- Infrastructure Management
Sitefinity Training and Certification Now Available.
Let our experts teach you how to use Sitefinity's best-in-class features to deliver compelling digital experiences.
Learn MoreMore From Progress


Latest Stories
in Your Inbox
Subscribe to get all the news, info and tutorials you need to build better business apps and sites