Sitefinity Ecommerce – Enhance your product images using Magic Zoom Plus
The content you're reading is getting on in years
This post is on the older side and its content may be out of date.
Be sure to visit our blogs homepage for our latest news, updates and information.
Sitefinity Ecommerce comes package with a free 3rd party image tool called Fancybox. FancyBox (www.fancybox.net) is a JQuery tool for displaying images, html content and multi-media in a Mac-style "light box" that floats overtop of web page. Fancybox is great tool to use for displaying images, however it falls short if you want to display large formatted images, or have the ability to zoom into an image. A great product I have used for many years is called Magic Toolbox (www.magictoolbox.com). Magic Toolbox enables web designers to create amazing user experiences using high resolution images, leading to better conversion, higher sales and lower returns. In this blog post, I will show you how you can integrate Magic Toolbox Plus into Sitefinity Ecommerce, allowing for visitors to zoom in or magnify images. (Please note that Magic Toolbox is not free, and the price for Magic Toolbox Plus is around $60 U.S, or . )
How it works
Magic Zoom Plus uses pure JavaScript and CSS for creating hover windows for showing image details. Magic Zoom Plus does not use any flash thus it can be used on any smart phone devices including the Apple IPhone. For more information about Magic Zoom Plus, please visit http://www.magictoolbox.com/magiczoomplus/
Getting Started
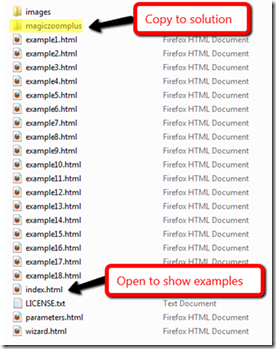
To begin, go to http://www.magictoolbox.com/magiczoomplus/ and download the trial version of Magic Zoom Plus. Unzip the package into a temporary folder and copy the folder magiczoomplus to your solution. You can also click on the index.html file to see all of the examples and configuration settings to for Magic Zoom Plus.
Once you have copied the folder magiczoomplus into your solution, you need to create a new view to use on the Product List widget. Below I have included two example of the template used for the product list/detail widget. The first example is the default template included with Sitefinity which uses Fancybox to show image details. The second example is my new template which has the Magic Zoom Plus added to it.
EXAMPLES
First Example:
Second Example:
In the second example, I have commented out the lines which references to Fancybox, and replaced these lines with code for Magic Zoom Plus. On line 66 of the second example, you can see where we replaced the code to include the main image and not to skip over it. This is ideal so that the main image can always be selected however it does create a new thumbnail whereby Fancybox skips over the main image. I also added the code whereby if there is only 1 image to display, no thumbnail will be created below it.
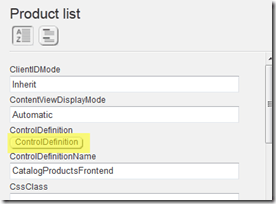
Once you have the new view/widget template, you need to tell the Product List widget where to find this new template. In my video example, I created a top level folders called View, and added a Web User Control to this file calling the file name ProductDetailViewCustomZoom.ascx. To tell the Product List Widget where to find this new template, edit the backend page in Sitefinity which has the product list widget on it. Edit the properties of the Product List Widget and click on “Advanced” at the bottom. In the advanced settings, click on the button ControlDifinition .
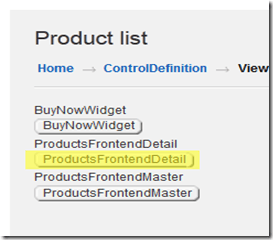
In the ControlDefinition settings, scroll to the very bottom and click on the “View” button. This will take you in the Views configuration. Click on the ProductFontendDetail view button as shown below. This will take you in the properties for the product list detail view configuration.
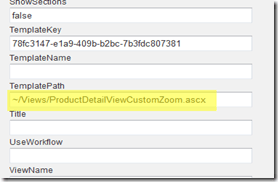
Near the bottom of the view window, you will see a configuration setting for template path. Here is where you want to tell the product list widget the new view/template you want to use.
It is very important that you make sure this path is correct. If it is not, or there are errors in your new template, you will not see any product detail information displayed. Save all screens and publish the page and you should now have Magic Zoom Plus installed as an alternate way of showing product images.
Video in action
Please watch my video below for more detail information

The Progress Team
View all posts from The Progress Team on the Progress blog. Connect with us about all things application development and deployment, data integration and digital business.
Comments
Topics
- Application Development
- Mobility
- Digital Experience
- Company and Community
- Data Platform
- Secure File Transfer
- Infrastructure Management
Sitefinity Training and Certification Now Available.
Let our experts teach you how to use Sitefinity's best-in-class features to deliver compelling digital experiences.
Learn MoreMore From Progress
Latest Stories
in Your Inbox
Subscribe to get all the news, info and tutorials you need to build better business apps and sites
Progress collects the Personal Information set out in our Privacy Policy and the Supplemental Privacy notice for residents of California and other US States and uses it for the purposes stated in that policy.
You can also ask us not to share your Personal Information to third parties here: Do Not Sell or Share My Info
We see that you have already chosen to receive marketing materials from us. If you wish to change this at any time you may do so by clicking here.
Thank you for your continued interest in Progress. Based on either your previous activity on our websites or our ongoing relationship, we will keep you updated on our products, solutions, services, company news and events. If you decide that you want to be removed from our mailing lists at any time, you can change your contact preferences by clicking here.


